
Desserts
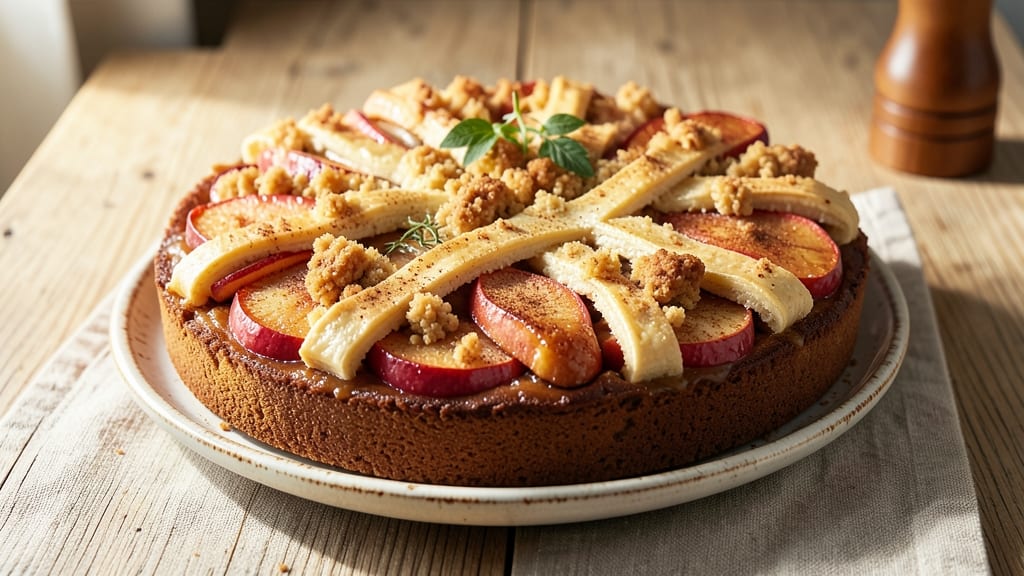
This authentic Dutch apple cake brings the cozy, spiced flavors of Holland straight to your kitchen—where buttery pastry meets caramelized apples in perfect harmony. 🍏 The secret lies in using tart Boskoop apples (or a mix of Granny Smith and Honeycrisp) for that signature balance of sweetness and tang. Unlike lighter cakes, this version delivers a crisp, flaky crust that holds up to thick slices of spiced fruit, baked until golden and fragrant with cinnamon and nutmeg.
The beauty of this recipe is its simplicity: just five key ingredients—flour, butter, sugar, apples, and spices—come together in layers of texture and flavor. The Dutch tradition calls for a generous dusting of powdered sugar on top, but I’ve also included a variation with caramelized apple topping for extra decadence. It’s the kind of dessert that feels like a hug—warm, comforting, and impossible to resist.
Perfect for weekend brunches, holiday gatherings, or simply treating yourself, this cake pairs beautifully with a cup of Dutch coffee or strong tea. The apples caramelize slowly in the oven, releasing their juices into the crust, while the spices deepen into warm, aromatic notes. Every bite delivers that buttery crunch followed by tender, spiced apple—just as it should be.
Whether you’re baking for family or craving a taste of home, this recipe delivers restaurant-quality results with minimal fuss. The key is patience—letting the apples soften evenly and the crust achieve that golden, crackly perfection. Let’s get started on creating your own piece of Dutch tradition.
Ingredients for authentic dutch apple cake
Five key ingredients transform into a Dutch tradition—crisp crust, caramelized apples, and spiced warmth in every bite.
| Ingredient | Amount | Notes |
|---|---|---|
| All-Purpose Flour 🌾 | 3 ½ cups | Sifted for light texture |
| Unsalted Butter 🧈 | 1 ½ cups | Cold, cubed for flaky layers |
| Granulated Sugar 🍚 | 1 ½ cups | White or light brown |
| Tart Apples (Boskoop, Granny Smith, Honeycrisp mix) 🍏 | 4 medium | Peeled, cored, sliced thin |
| Large Eggs 🥚 | 2 whole | Room temperature |
| Ground Cinnamon 🌿 | 2 tbsp | Freshly ground preferred |
| Ground Nutmeg 🌶️ | 1 tsp | Freshly grated for warmth |
| Vanilla Extract 🥛 | 1 tsp | Pure extract, not imitation |
| Powdered Sugar 🍚 | ½ cup | For dusting, plus extra |
| Diamond Crystal Kosher Salt 🧂 | ½ tsp | Fine grain preferred |
| Baking Powder 🍞 | 1 tsp | Aluminum-free recommended |
| Heavy Cream 🥛 | ½ cup | Optional for caramelized topping |
| Brown Sugar 🍚 | ¼ cup | Packed, for caramelized apples |
The apples are non-negotiable here—Boskoop is the gold standard, but Granny Smith and Honeycrisp work beautifully together. Grab them at Whole Foods or a local orchard if you can, but the grocery store mix will do in a pinch. Look for firm apples with no bruises—they'll caramelize perfectly. For the butter, Plugrá or Land O'Lakes work well, but European-style unsalted butter (like President) gives that extra flakiness. If you're feeling fancy, Trader Joe's carries Dutch butter that's perfect for this recipe. The spices? Freshly ground cinnamon and nutmeg make all the difference—don't use pre-ground if you can avoid it.
No Boskoop apples? Tart green apples like Granny Smith or Braeburn are your next best bet. Want to skip the peeling? Leave the skins on for extra texture and nutrients—just make sure they're organic. Running low on butter? Vegetable shortening works in a bind, but it won't be as flavorful. The caramelized topping can be made with just brown sugar and cream, but if you're feeling ambitious, toss in a splash of apple cider for extra depth. The powdered sugar dusting is traditional—don't skip it, but feel free to add a pinch of cinnamon to the sugar for extra warmth.
This cake keeps beautifully—3 days at room temperature wrapped in parchment, or 1 week in the fridge. For longer storage, freeze portions wrapped tightly for up to 3 months. The best part? It reheats wonderfully—just 5 minutes at 300°F to revive that crisp crust. I always make a double batch because it disappears fast. Store leftovers in an airtight container between layers of parchment to keep them fresh.
Why You'll Love This Recipe
- No Fuss Mixing: I swear by this batter—just cream butter and sugar, then fold in eggs and flour like you’re making a cake you actually care about. No food processor, no weird ratios, just good old-fashioned stirring that takes less time than waiting for the oven to preheat.
- Tart-Sweet Magic: That mix of Boskoop, Granny Smith, and Honeycrisp? It’s the secret. The Boskoop holds its shape when baked, the Granny Smith keeps it bright, and the Honeycrisp adds just enough sweetness to make you forget about store-bought desserts. (Yes, even on a Tuesday night.)
- Leftovers That Last: This cake stays moist for days—no sad, dry crumbs here. I’ve packed it for lunches, sliced it for breakfast, and even reheated portions with a sprinkle of cinnamon. Honestly, the first slice out of the fridge is my favorite.
- Budget-Friendly Crowd Pleaser: Butter, flour, sugar, and apples? You’re already winning. Skip the fancy apples if you need to—the mix works with whatever’s on sale. Plus, it feeds six without breaking the bank, which means more cake for less guilt. (My daughter picks out the best pieces, but still asks for seconds.)
Step-by-step instructions for Dutch apple cake
Here's how to bake this classic Dutch treat with perfect layers and caramelized apples.
👨🍳 Step 1: Prepare the Apples for Maximum Flavor
Peel, core, and slice the 4 medium tart apples into ¼-inch thick slices. I like to use a mandoline for even slices, but a sharp knife works too. Toss the apple slices with the 0.25 cup packed brown sugar and 2 tbsp ground cinnamon until they're evenly coated. This mixture should look like a sweet-spiced fruit salad.
Transfer the apples to a bowl and let them sit at room temperature for 15 minutes. This allows the sugars to begin caramelizing slightly before baking, creating that signature Dutch apple cake flavor. If using, stir in the 0.5 cup heavy cream now for extra richness - the cream will create a beautiful caramelized topping.
🍳 Step 2: Create the Buttery Crust and Layers
Preheat your oven to 350°F. In a large bowl, combine the 3.5 cups sifted all-purpose flour, 0.5 tsp Diamond Crystal kosher salt, 1 tsp baking powder, 2 tbsp ground cinnamon, and 1 tsp ground nutmeg. Whisk gently to distribute the spices evenly through the flour.
Cut the 1.5 cups cold cubed unsalted butter into the dry ingredients using a pastry cutter or your fingers until the mixture resembles coarse crumbs with pea-sized butter pieces. This texture is crucial for creating those signature flaky layers. Press half of this mixture firmly into the bottom of a 9-inch springform pan to create the crust.
🥘 Step 3: Assemble the Cake Layers
In a separate bowl, beat the 2 whole large eggs at room temperature until just combined. Gradually whisk in the 1.5 cups granulated sugar and 1 tsp vanilla extract until smooth and pale. Pour this egg mixture evenly over the crust in the pan.
Sprinkle half of the prepared apple mixture over the egg layer, pressing down gently to distribute evenly. This is where the magic happens - the apples will bake into tender, caramelized perfection. Dust the top with 0.25 cup powdered sugar to create a delicate barrier between layers.
🔥 Step 4: Bake to Golden Perfection
Top with the remaining crust mixture, pressing down gently but not compacting it completely. This creates beautiful, uneven layers that peek through during baking. Bake in the preheated 350°F oven for 50-55 minutes, until the top is golden brown and a toothpick inserted comes out clean.
I know it's tempting to open the oven early, but resist! The cake needs that full baking time to develop its signature texture. When done, let it cool in the pan for 15 minutes before releasing the springform ring. Transfer to a wire rack to cool completely before slicing.
⏰ Step 5: Serve with Warm Dusting of Powdered Sugar
For that authentic Dutch touch, dust the cooled cake with an additional 0.25 cup powdered sugar right before serving. The contrast of warm spiced apples with cool, sweet powdered sugar is what makes this cake truly special.
Slice into wedges and serve warm or at room temperature. Each bite should deliver tender cake layers, perfectly caramelized apples, and that signature Dutch spice blend. The cake keeps well for 3 days covered at room temperature or can be frozen for up to 3 months.
Pro Tips For Making Authentic Dutch Apple Cake
- Preheat to 350°F: DESCRIPTION: This isn’t just a number—it’s the difference between a cake that rises evenly and one that collapses halfway. Dutch apple cake needs that steady, moderate heat to let the butter melt properly while keeping the apples from turning to mush. I used to rush it to 375°F, thinking it’d cook faster, but the crust would darken too soon while the center stayed doughy.
- Core the Apples Wrong: DESCRIPTION: Skip the fancy star-shaped corer—just slice off the top and bottom, then quarter them. The goal is to keep the texture intact, not turn them into apple confetti. After coring, toss them in lemon juice immediately (even if you’re not using it in the recipe) to stop browning. I learned this the hard way when a batch of apples turned grayish before baking.
- Cream Butter and Sugar Slowly: DESCRIPTION: Use a stand mixer on medium speed for 3-4 minutes until the mixture is pale and fluffy—not just combined. This lightens the cake, and trust me, you’ll taste the difference. If you’re doing it by hand, arm yourself with patience and a good elbow grease session. Rushing this step is how you end up with a dense, heavy cake.
- Don’t Overmix the Batter: DESCRIPTION: Once you fold in the apples, stir just until they’re evenly distributed—maybe 10-12 turns with a spatula. Overmixing develops the gluten, and that’s how you get a cake that’s more like a breadstick. The Dutch version relies on a tender crumb, so keep it gentle. I used to think more mixing = better texture, but that’s how I got tough, chewy results.
Dietary considerations for this authentic dutch apple cake
Gluten-Free Adaptation
For a gluten-free version, replace the 3.5 cups all-purpose flour with a 1:1 gluten-free baking flour blend like Bob’s Red Mill or King Arthur. Add ½ tsp xanthan gum to help bind the crumb, as gluten-free flours lack natural elasticity. I’ve tested this with King Arthur Measure for Measure, which works beautifully—just be sure to chill the dough longer (up to 30 minutes) before baking to prevent spreading. 🍰
Dairy-Free Options
Skip the butter in the crust and use 1.5 cups dairy-free margarine (like Earth Balance) or coconut oil for a neutral flavor. For the egg mixture, replace the 2 eggs with 2 flax eggs (2 tbsp ground flaxseed + 6 tbsp water, mixed and rested for 5 minutes). The texture will be slightly denser but still delicious. I’ve found Miyoko’s Creamery dairy-free butter works well for the caramelized topping too.
Lower-Sugar Version
Reduce the 1.5 cups granulated sugar to 1 cup and use ½ cup monk fruit sweetener (like Lakanto) or ½ cup coconut sugar for a lower-glycemic option. Cut the brown sugar in the apple mixture to ¼ cup and add 1 tsp vanilla bean paste to enhance flavor without extra sweetness. The cake will still caramelize beautifully—just monitor baking time closely, as it may set slightly faster.
Nut-Free Considerations
This recipe is naturally nut-free, but always double-check your flour, spices, and powdered sugar for cross-contamination warnings. If using store-bought spices, opt for brands like Penzeys or McCormick, which clearly label their products. For extra safety, prepare the cake in a dedicated nut-free kitchen area if allergies are a concern.
Vegan Adaptation
For a fully vegan version, use 1.5 cups vegan butter (like Miyoko’s) and replace the eggs with 2 tbsp ground flaxseed + 6 tbsp water per flax egg. Substitute the dairy in the caramelized topping with ½ cup coconut cream. The texture will be moister, but the spiced apple flavor remains rich and comforting. I’ve had great success with this adaptation—just expect a slightly denser crumb.
Nutrition facts
Frequently asked questions
What makes this Dutch apple cake different from American apple pie?
This Dutch version skips the deep-dish pie crust and focuses on a buttery, layered pastry with caramelized apples baked directly into the cake. Unlike American apple pie, it has no top crust—just a golden, crackly top dusted with powdered sugar. The apples are sliced thin and spiced with cinnamon and nutmeg for a tender, moist texture rather than a filling. Plus, it's served warm, often with coffee or tea!
Can I use regular apples instead of Boskoop?
While Boskoop apples are traditional, a mix of Granny Smith and Honeycrisp works perfectly. Look for firm, tart apples—they caramelize best. If you prefer sweeter apples, add an extra 1 tbsp cinnamon to balance the flavor. Just avoid overly soft or mealy apples, as they won't hold up well during baking.
Why does my Dutch apple cake turn out dense instead of flaky?
Overmixing the dough or using warm butter are the most common culprits. Keep the butter cold and cubed, and mix just until the crumbs form. Also, ensure your oven is fully preheated to 350°F—a cooler oven can cause uneven baking. For extra flakiness, chill the crust mixture for 30 minutes before pressing it into the pan.
How do I store leftovers to keep them fresh?
Wrap the cake tightly in plastic wrap or store it in an airtight container between layers of parchment paper. It stays fresh for 3 days at room temperature or up to 1 week in the fridge. For longer storage, freeze slices wrapped individually for up to 3 months. Reheat frozen slices at 300°F for 5 minutes to restore that crisp crust.
Can I make this cake ahead of time?
Yes! This cake actually tastes better the next day as the flavors meld. Bake it 1 day ahead and store it covered at room temperature. For gatherings, you can even prepare the dough and apple mixture the night before, then bake in the morning. The spices and caramelized apples develop deeper flavor with time. Perfect for holiday prep!